How to create joint injection template on EMIS
If you do joint injections, then having a template in EMIS can help speed things up, as well as give useful prompts on what to mention regarding informed consent and recovery. There may be already one on your system but it may not be appropriate to your practice or may not include what you want it to include. Below I'll show you how to create your own Joint Injection template on EMIS which you can customise to how you want it.
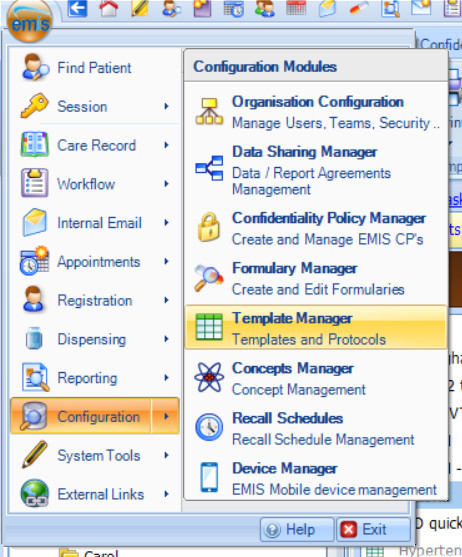
Then in the new screen, create a new template.

This will open a screen below which gives you many options to customise your template.

The page adopts a simple drag and drop system to create your template. You can right click on existing sections to edit it. For our joint injection template, I like to put a consent section at the start which makes it easy to go through with the patient. I create a tick box system to check off the points that I have gone over with the patient. To do this, you can drag over the "Predefined Text" into the first section. This will open up the below box.

You can fill in the appropriate information for the risks of the procedure here. When you have the completed template, you will just have to tick that you have mentioned it to the patient. The "Tooltip Text" box just will give you some information if you need it to tell to the patient (statistics for example). You can change the Consultation Section of this point, I like to put it in the assessment section but equally could go into History section of a consultation. You repeat this bit for all the risks of the procedure you would want to relay to the patient. It will look like this on your screen.

I like to also add an indication for the injection. So I add a free text box at the end of the first section, though could equally go at the start of the procedure section. To do this, drag over the "Enter Free Text" section and label it 'Indication'.
To create a new section, drag over the component called "New Section" (found in "Template Layout Components") to below the previous one, and right-click to change the name to 'Procedure'.
In this new section, you can add a "Predefined Check Box" to indicate you've got informed consent and then you can drag over "Code Pick List" and put that in the new section. This will allow you choose from various codes for steroid injections that will allow you to get paid for the injection. Just search for the ones that you do and add it to your list. In the consultation section, you can change that to 'Procedure'.


You're pretty much done! Optionally you can add in other sections such as "Text Pick List" for any complications you encounter. This allows you to choose the customisable options from a drop down menu.

Also useful is a further section for post-procedure aftercare, again using Predefined check boxes to make sure you don't miss anything out and placing it in the comments section on the consultation.
Now at any point, if you want to preview your template you can press the "Preview" button, which will show you want it looks like without leaving the editor.
All that is left is to save your finished product and load up a patient and try it out for real. Below is what it will look like in your patient's consultation.

If you found that useful, please share below.


Comments
Post a Comment